|
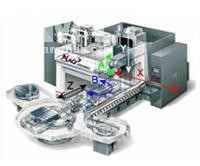
An innovative methodology for large machine tool calibration A joint project of NCMS called Volumetric Accuracy for Large Machine Tools (VALMT), partnering Automated Precision, Boeing, Siemens and Mag Cincinnati, has pioneered an innovative process and established new methodology in volumetric error compensation for large machine tools. Volumetric error compensation, or VEC, is a true volumetric calibration that improves close tolerance and working accuracy of complex five- and six-axis machine tools throughout their entire working envelope. Volumetric error compensation uses API’s T3 Laser Tracker and patented Active Target to precisely calibrate large machine tools in a matter of hours. Using a single set-up, the laser tracker performs continuous measurements to map the machine tool as it moves throughout its entire working volume. The measurements are done in a single coordinate system rather than along three axes, resulting in a true volumetric map of the machine tool’s accuracy. Advanced VEC software then processes the data in a matter of minutes. This software has the ability to simulate the entire machine tool path, graphically display the volumetric error, calculate compensation tables, verify the compensation values, and upload them directly to the controller. Since the entire working volume is mapped at once, more-complex five- and six-axis machines with a wide variety of rotary tables and axes can be compensated easily and quickly. Using traditional 21-error-parameter methods, these more-complex machine designs become problematic, since they often have between 40 and 50 error parameters. VEC accounts for every point in the machine tools’ working volume, determining not only position but orientation. Test results have confirmed at least a four-fold improvement in machine tool accuracy in a fraction of the time using the VEC process versus traditional calibration methods. Introduction Day after day it’s the same problem for machine tool owners. They spend well into six figures for a high-precision machine tool and they have a great deal of difficulty determining why it’s not cutting parts accurately. The typical culprits are usually the same—ball screw or rack and pinion errors due to wear, machine build tolerances, metal fatigue, maybe even foundation problems like sag all contribute to the inaccuracies they face. The answer to these problems has been known for many years—volumetric error compensation. A complete error mapping of the machine tool through its entire working volume yields a comprehensive understanding of the condition of the tool center’s accuracy. Modern machine tool controllers allow for compensation values to be applied during the machine’s movement to correct existing positioning errors in real time. So the obvious question is, “Why doesn’t everyone do it?” The answer has complex layers. First, it’s usually expensive to completely error map a machine, not only in raw costs but in lost production. In addition to the expense, this type of work demands very sophisticated equipment and an extremely high degree of technical expertise, so many companies end up contracting out this type of work. But by far the biggest reason most manufacturers don’t regularly perform this type of error mapping and compensation is the time it takes to go through the process. Traditional machine tool calibration and compensation Traditional methods of machine tool calibration use the 21-error-parameter process to determine the volumetric inaccuracies on a simple three-axis machine tool. By using a laser interferometer, each axis of travel (X, Y, and Z) is measured, one at a time. These techniques require multiple set-ups of the laser to map the machine, which is a very time-consuming process subject to thermal drift as the machine stands idle. Each of the three linear axes has six error parameters (i.e. linear position, vertical and horizontal straightness, pitch, yaw, and roll). Each axis requires a different set-up and its own measurement runs. Usually two measurement runs are done along each axis for each of the six possible error parameters as a validation of the measurement data. So 36 measurement runs are necessary to collect data for just the first 18 error parameters. Three more error parameters determine squareness of each of the X, Y, and Z axes to each other: X to Y, Y to Z, and Z to X, for the total of 21 error parameters. Once this data is collected, it can takes hours to process and determine the compensation factors for each of the machine tool’s 21 error parameters. Thermal differences between daytime and nighttime temperatures over a period of days or even weeks significantly degrade the raw data measurements. API’s most modern laser interferometer, the XD6, measures all six degrees of freedom along each linear axis in a single measurement run. Currently, a three-axis machine requires only six measurement runs to complete the data set instead of 36. Unfortunately, you still can’t measure roll in the vertical axis without an additional set-up and equipment. Although this newest advanced laser interferometer significantly decreases measuring time to just a few days or hours for smaller machines, the possibility of thermal drift can still add significantly to the measurement error in large five- and six-axis machines. A general rule of thumb for determining the number of error parameters on any given machine tool can be seen in the following equation: Total number of error parameters = 6*(number of axes) + 4*(number of rotary axes) + 2*(number of translation axes) + Degree of Freedom (DOF) of the tool – 6 for work piece alignment (which isn’t considered a machine tool accuracy error, but rather a set-up error). For the example of a simple 3 axis Cartesian machine we get: 6*3 + 4*0 + 2*3 + 3 – 6 = 21 error parameters. The real problem with this traditional 21-error-parameter method is its inherent shortcomings for more complex five- and six-axis machines. Even after all this time, equipment, expertise, and expense, you only measure 20 of the 21 error parameters. However, a quick calculation using the formula to determine the number of error parameters for a given machine tool demonstrates the problem. For a typical five-axis machine with two rotary axes, the number of possible error parameters grows dramatically: 6*5 (number of total axes) + 4*2 (number of rotational axes) + 2*3 (number of translational axes) + 5 (D.O.F) – 6 (work piece alignment) = 43 total error parameters It’s no wonder that the 21-error-parameter methodology is totally inadequate for true volumetric machine tool error compensation. The VALMT project The VALMT Project was begun to address these shortcomings. Automated Precision partnered with Boeing, Siemens, and Mag Cincinnati to develop a revolutionary measuring concept with a completely new methodology for volumetric error compensation for large machine tools. The process was tested and refined at four other partner facilities at Warner Robins Air Logistics Center, The Naval Foundry & Propeller Center, Fleet Readiness Center East, and Anniston Army Depot. The resultant technology offers a fast and efficient alternative to the 21-error-parameter method of machine tool calibration and compensation.

VEC can be done with a single set-up on three- to six-axis machine tools and quickly measures the entire working volume in a single coordinate system. Because it doesn’t depend on measuring each linear axis, VEC measures this working volume and maps exact machine tolerances of where the machine tool’s actual position is, compared to its commanded location. The entire process can be done on even the most complex machine tools in just a few hours, resulting in less machine downtime and minimal temperature drift compared to other methods. Compensation values are automatically calculated, verified, and uploaded to the controller to provide real-time compensation values with each movement of the machine tool. Fourfold or better increases in machine accuracy for repeatable machines have been verified on a variety of machine tools. The VEC process The VEC process is based on a special set of algorithms using Chebyshev polynomials. API’s proprietary software calculates a polynomial-based kinematic equation to describe the error model for each machine so it can then compensate any coordinate within the machine tool’s working volume. The first step is to build the VEC machine model. Using a CAD model of the machine tool, the kinematic error model is constructed based on the complexity of the machine and the wide variety of work functions. Complex machine tool features such as rotary tables, linear slide tables, or complex five- and six-axis machine tools are as easy to configure as a standard three linear axis machine tool. From this kinematic error machine model, the API software develops a measurement plan that avoids collision with any objects within the working volume like fixtures, monuments, jigs, or even the machine itself.

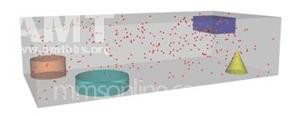
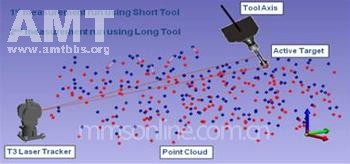
API’s software generates a specific measurement plan defining a complex path for the machine tool to follow avoiding all obstacles during the measurement process. Within the machine’s working volume, between 200 and 400 random points are generated to represent all of the possible machine poses in each axis as the final measurement plan. During measurement, API’s T3 Laser Tracker will follow the machine tool center point as it moves along this predefined path, fully exercising the machine tool’s complete functionality. The software simulation ensures these random points are collision-free and will not break the laser beam from the Tracker3 to the Active Target which is loaded into the machine spindle during measurements. At this point the actual measurement can begin. It takes between one and three hours to measure the entire machine regardless of size or complexity. Due to its extremely compact design and the industry’s largest working volume, the T3 Laser Tracker can be mounted either inside or beside the machine tool. The Active Target is mounted to a spindle which is inserted into the tool center point. The Active Target is a motorized SMR which continually moves the internal retroreflector, keeping constant beam lock and measurement contact with the Laser Tracker. As the machine tool moves to each new point, it comes to a stop. There is a few second dwell to allow the machine to come to complete rest and stabilize in its desired position. The T3 Laser Tracker then measures the point between 30 and 100 times in about three seconds. Once this measurement is averaged and recorded the machine tool moves to the next position in the measurement plan. There are three measurement runs; the first attaching the Active Target with a long tool adapter and second repeating this run for validation. A third and final measurement run is done attaching the Active Target to a shorter tool adapter. This not only measures every point three times but actually produces a vector for each point by using both the long and short adaptors. This method yields extremely accurate positioning data as well as orientation data for each point in the measurement plan. The 300–400 points now form a point cloud defining the working volume as a block rather than simply three adjacent planes. In addition to the point cloud there is a virtual bar connecting each point to the one measured before and after it.

As seen in the figure below, these vector points and connecting bars begin to completely define every point in the working volume. Performing tens of thousands of calculations, the position of any given point in the volume can be accurately determined defining both position (i.e., the X, Y, and Z axes) and orientation (i.e., pitch, yaw, and roll). From here the software can automatically calculate the necessary compensation values needed to bring the actual position of the machine tool center point to the desired or commanded position. These compensation values are stored in a table which will later be loaded into the machine controller to perform real-time compensations. Validation of data Once the data is gathered, a K-fold cross-validation is run within the software before the compensation data is sent to machine controller. In a K-fold cross-validation, the original sample of data points is partitioned into K number of subsamples. Of the K subsamples, a single subsample is retained as the validation reference data for testing the model, and the remaining K − 1 subsamples are used as test and training data. The cross-validation process is then repeated K times, with each of the K subsamples used exactly once as the validation reference data. The K results from the folds can then be averaged (or otherwise combined) to produce a single estimation. The advantage of this method over repeated random subsampling is that all observations are used for both training and validation, and each observation is used for validation only once. Once the K-fold cross-validation test is passed, API’s software interface loads the machine calibration results directly into the machine controller interface, to do real-time verification or compensation. The machine controller compile cycle takes every movement of the machine tool center point from any given point A to point B and divides into equal time segments. As the machine tool moves to a commanded position, the compensation values are applied to each movement time segment to compensate the tool positioning through every step of its movement. Results In a variety of field tests and now through actual machine tool compensation events, this new volumetric error compensation methodology has proven to improve machine tool accuracy by fourfold or better. Below is a chart showing five different types of machine tools which were compensated using VEC. The maximum error used as a benchmark was defined as the largest single error in any error parameter of the machine. In many instances the machine owner was unaware of the exact condition of the machine before the error-mapping process. Machine 2, for example, had a 1-mm positioning deviation before VEC but reduced the maximum error to just 39 microns after VEC. Before VEC Max error After VEC Max error Machine 1 .424 mm .196mm
Machine 2 1 mm .039 mm
Machine 3 .162 mm .041 mm
Machine 4 .02076 in .00354 in
Machine 5 .01206 in .00360 in Perhaps the most interesting case is Machine 3. This machine was compensated using the traditional 21-error-parameter method immediately before using the VEC process. Even in a machine tool that had just been compensated, VEC improved tool center point accuracy fourfold. Below are several charts graphically showing the improvement in machine tool accuracy after applying VEC. Each bar represents the number of points measured and there deviation from the true zero point of the commanded position. After using the VEC process, the controller applies the compensation values in real time, and all of the measured points fall within a much tighter tolerance range. ·All machines showed that volumetric compensation improves the static positioning accuracy ·All machines could be compensated to better than three times the process repeatability
Before VEC Comp Conclusions The VEC process offers significant advantages over traditional compensation methods. Even larger five- and six-axis machines can be compensated with a single set-up, reducing the likelihood of set-up errors. The measurement plan exercises the full range of motion of the machine tool and measurements are taken within the full volumetric work envelope. The VEC method combines kinematic errors and interrelated geometric effects, a distinct advantage over current axis-by-axis methods. Measurements are accomplished within a single coordinate system using laser tracker technology that has proven to be a simple metrology tool that does not require extensive training to use. The T3 Laser Tracker and Active Target are perfectly suited for the VEC process and virtually eliminate operator intervention during measurement. The entire measurement process can be accomplished in a matter of hours rather than days, resulting in more accurate measurements and eliminating costly machine downtime. Calibration is performed in a single set-up with automated measurement of hundreds of points and is completed in just a few hours compared to alternate methods that can take much longer. By accomplishing the measurement task in such a short timeframe, the measurement data is far more reliable. Thermal expansion and contraction that normally affect measurements taken over a several-day time period are almost eliminated. Finally, since the entire working volume is compensated using VEC, the overall volumetric accuracies are improved fourfold or better on repeatable machines. ·Rapid calibration minimizes compensation errors due to thermal changes over time ·Reduces machine down time to a fraction of traditional methods ·True volumetric accuracy at all machine poses ·Real time compensation directly from the machine controller ·Reduced scrap from out-of-spec parts ·True understanding of the machine’s capability
|  |联系我们|法律声明|用户协议|AMT咨询|商务合作|会员入驻|积分充值|积分商城|积分奖励规则|TradEx全球购|加入QQ技术群|添加企业微信|加入微信技术群|文章投稿|手机版|
世界先进制造技术论坛™(简称AMT™, 制造知网™)
( 沪ICP备12020441号-3 )
